This is the first time I've made a card without a sketch in a very very long time. I'm very pleased with the outcome. I am not very pleased with the outcome of the picture on the other hand. I really need to make a white box for photographing things like this but where on earth would I put it? There is absolutely no space anymore, I barely have enough room to maneuver (that word is waaaay too close to manure) myself to my desk, never mind having a huge box and lights hanging around. I really need to clean this place out. Thank God the neighborhood yard sale is in a few months. I need to start getting ready for that ASAP. Before I can do that though, perhaps I should finish writing about this card yes?
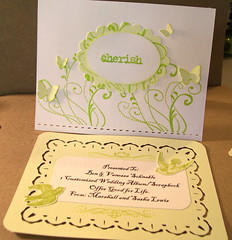
So this is the first time I've used the Cricut (yes folks, I am now the proud owner of a Cricut Expression machine in case I haven't said so about 15 hundred times already) to make a card/envelope set. I also had it bang out that nifty little certificate. I'm telling you, I could get used to not having to cut things out by hand real quick. It's so super handy for lettering too. I haven't even flexed all of the Cricut muscle yet and I'm a little intimidated, but it's fun. I still cut out way more stuff than I need to because I'm so enamored with the features. I can't just put in a piece of paper to cut one thing out, I have to start punching in things to fill the whole paper. I'm going to be overrun very soon. I don't care. I'm sure I can always use the stuff for swaps and other projects.
So I started this card sometime yesterday (shhhh the wedding was Saturday, can you say procrastinate? I can, in fact I just did). Actually I'm fibbing a bit. I started the concept of the card on Friday only to find out that our babysitter backed out last minute and we weren't going to be able to make it to the wedding. Once I realized I had more time I stopped rushing, decided that my original concept was too dark and gloomy for a celebration of such magnitude so I scrapped it and waited for someone to post pictures of the wedding on Facebook. Once I saw the color scheme and style I restarted the process and all of this flowed together relatively effortlessly. I woke up sometime at 2:30am today, worked a bit on the card, did the dishes, made cinnamon rolls, went back to bed, woke up again at 8:30 am (thank you Marshall for letting me sleep late, you really do love me). Once I got back to making the card it was just a matter of stamping, embossing and sticking it all together. Now it's safely in an envelope that needs to make it into my husband's laptop bag. I'm positive it will be completely destroyed, but it's the thought that counts and I can always send them a link of the picture, right?
Monday, April 27, 2009
Wednesday, April 22, 2009
Another Card Challenge Day with Jess
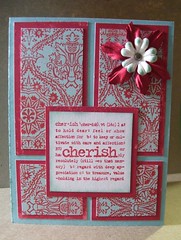
This is SC225. It's a pretty little number in my current favorite color scheme of blue, white and red. It's very similar to the first card I ever made with Jess so I guess I just like the same kind of papers in different colors and I rather like the Lexicon of Love stamps and Prima flowers. So be it. I can live with that.
Tuesday, April 14, 2009
Organizing my stamps...
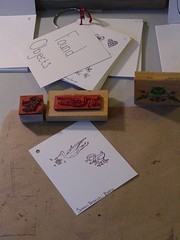
Have you ever submitted a card or scrapbook page or other arty crafty item only to realize that you can't remember the names of the stuff you've used? It happens to me all the stinking time. Ok, well maybe I don't submit stuff all the time, but when I do I'm sometimes stumped by who made what I've used. Sometimes I'm lucky and the product information is on the product, most of the time it isn't and I wasn't smart enough to write it down. Those days are over.
Right now I'm making a catalog of all of my stamps, clear and rubber. I've cut scraps of white cardstock into 4"x5" rectangles and I'm stamping the images onto them. Then I write down the product info on the bottom of the card and indicate what kind of stamp (rubber or clear) in the upper right hand corner with an R or C. Then I punch a hole in the upper left hand corner and put them on one of those binder rings. Now, not only can I flip through to find a particular image when I'm looking for one, but I can also flip through and find who made it. I'd like to do this with some of my unmarked papers as well. Some of them have the info on the back, some don't. For the ones that don't, I think I'll do something similar. Yay for organization! It was about time.
Right now I'm making a catalog of all of my stamps, clear and rubber. I've cut scraps of white cardstock into 4"x5" rectangles and I'm stamping the images onto them. Then I write down the product info on the bottom of the card and indicate what kind of stamp (rubber or clear) in the upper right hand corner with an R or C. Then I punch a hole in the upper left hand corner and put them on one of those binder rings. Now, not only can I flip through to find a particular image when I'm looking for one, but I can also flip through and find who made it. I'd like to do this with some of my unmarked papers as well. Some of them have the info on the back, some don't. For the ones that don't, I think I'll do something similar. Yay for organization! It was about time.
Sandra's Cards
This is a batch I made using the Split Coast Stampers challenge forums. I made them for my mommy in-law and gave them to her for Easter. She really liked them.

Sunday, April 05, 2009
Recipe Book WIP
Thanks to Jess of Sassy Ink Designs, I've been inspired to tidy up my recipe binder. I'd like it to have a vintagy 1940's-'50's feel. We'll see how that goes. So far I have the recipes sorted by category and type and put in page protectors. It looks like this is going to take more than one binder though. These are all recipes I started collecting when I first got married. I haven't tried them all but I would like to. Maybe I'll do that this year, introducing a new recipe every week. I can't predict how that will go. My husband and daughter both are very picky eaters. At least I know that I'll eat it, no matter what. So will my BFF G. She likes my cooking.

Quickie Cards
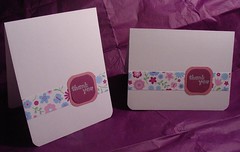
I whipped these up while watching Steven Colbert. They're for E to use in order to thank those who gave her gifts for her birthday. I'm totally in love with my corner rounder.
Supplies:
8.5"x11" White Cardstock (for card base)
DCWV floral pattern paper from the summer stack of 2006
Pink Bazzil textured paper
Dark Perfect Plum ColorMates cardstock
EK Success corner rounder
Memory Maker's square punch double set in 11/4" and 1 1/2"
American Craft's Rub Ons Accessories Book Three in white
Adhesive.
These cards are made by cutting the white cardstock in half either lengthwise or widthwise, depending on how you want them to stand. The tall card is lengthwise. I cut the floral strips exactly one inch wide and as long as the width of the card. Then I took the Square punch and, using the larger square, punched out the pink Bazzil paper. Using the smaller square I punched out the plum colored card stock. Then I took the corner rounders to the corners of the squares. I individually cut out the funky, handwritten thank you's from the AC's Accessory Book and rubbed them onto the plum colored rounded squares, then glued the plum squares to the pink squares. Next I glued the floral strip to the card and glued the sandwiched squares over the strip and onto the card. Ta da! All those words for a card that took me less time to make than describe.
Saturday, April 04, 2009
Playing Catch Up...again
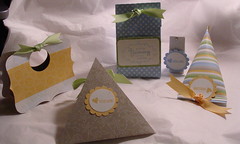
Jess Lundahl of Sassy Ink. Designs held a class last Saturday and taught us how to make these lovely little containers. I used the template for the tiny little container to make goodies for E's 7th birthday party. They were perfect! Jess truly is an inspiration to me and keeps me interested in making things for fun and not because I have to. I'm looking forward to her next class.
Subscribe to:
Posts (Atom)
